CLIA Analysis System
Frequently Asked Questions
1. Each reagent package must be examined before use. Product integrity may be compromised in packages that have been damaged. Inspect the package for the signs of leakage or moisture. If there is evidence of leakage or improper handling, do not use the reagent.
2. Pay attention to the expiration dates and open-container stability days of all the reagents. Be sure not to use expired reagents.
3. Pay attention to the storage temperature of the reagent (different reagents have different requirements, so you need to refer to the reagent label)
4. Do not ingest any reagent. In case of ingestion, seek medical attention promptly.
4.1. Avoid contact with skin. In case of contact, rinse the affected area immediately with ample amount of clean water.
4.2. Avoid contact with eyes. In case of contact, rinse the affected eye immediately with ample amount of clean water and seek medical attention promptly.
Generally, there are two types of expiration dates of reagents:
One is the storage expiration date of the reagent, that is, the final date on which the reagent can be stored under normal storage conditions (without opening the container);
The other is the open-container expiration date of the reagent, that is, the number of days during which the reagent can be used after the container is opened.
Different reagents have different storage expiration dates and open-container expiration dates, as well as different storage and use temperature requirements. You need to refer to the label or instructions manual of the specific reagent.
Human K2EDTA, K3EDTA and Na2EDTA plasma collected in plastic tubes are recommended for BNP test. Blood collection tubes from various manufacturers may contain additives which could affect the test results in some contain additives which could affect the test results in some cases. Studies have shown that containers with negative charges on the surface, such as glass, thioesters, dextran sulfate, etc., can activate blood coagulation factor XII, thereby converting the prekallikrein into kallikrein to promote the degradation of BNP in the plasma. Therefore, plastic tubes are recommended for the material of blood collection tubes, or silicide glass tubes. Non-silicide glass tubes cannot be used for blood collection of BNP. Not all available tubes of on the market were tested by Mindray. Each laboratory should determine the acceptability of different blood collection tubes and plasma separation products.
DCF indicates the instrument photometer is aged. Restart the analyzing unit and home the system. If the error remains, contact an engineer to repair the photometer.
VAM indicates that the calibration test is unfinished during the calibration process, causing the calibration parameters cannot be calculated. Please check whether the reagents and calibrators are qualified, whether the instrument is in normal condition, and then recalibrate.
DUP indicates a calibration repeatability error, CV is larger than the repeatability index obtained from the reagent barcode. Please check whether the reagents, calibrators and substrates are within expiry date and mixed well, whether the sample volume is sufficient, whether the instrument status is normal, exclude the reason and then recalibrate.
MON indicates the monotonic check of the calibrators RLU failed, the actual tested luminescence value does not meet the requirement of ascending sequence of sandwich method and the descending sequence of competitive method. Check whether if the calibrators are placed in the wrong order, place them in the right order and recalibrate. If the error remains, contact the customer service department.
DEV indicates the calibrator RLU deviation out of range, the check fails. There may be the following reasons:
- The reagent, calibrator, substrates and consumables have expired or became ineffective;
- Instrument with poor performance caused by unprecise probe aspiration, unstable photometer and poor washing ability etc.
If resulted by the 1st reason, replace with a new one and recalibrate, otherwise, contact the customer service department for advice and maintenance.
SLO indicates the slope of calibration curve exceeds the slope fluctuation range defined in the bar code. calibration slope check failed. Usually appears accompanied with DEV alarm. There may be the following reasons:
- The reagent, calibrator, substrates and consumables have expired or became ineffective;
- Instrument with poor performance caused by unprecise probe aspiration, unstable photometer and poor washing ability etc.
If resulted by the 1st reason, replace with a new one and recalibrate, otherwise, contact customer service department for advice and maintenance.
COV indicates the calibration curve not convergent, for nonlinear calibration, a satisfying base cannot be calculated and no calibration curve is drawn. Check that the reagent and calibrator are normal, and then recalibrate. If the error remains, contact our customer service department.
RCV indicates the tropic concentration of the calibrator out of range, recovery regression check failed. A curve named working curve will be generated after calibration, substitute the calibrator RLU into working curve to calculate the concentration of the calibrator. The bias% between the calculated concentration and the defined calibrator concentration should be less than the defined limit, or calibration failed with RCV alarm. Check whether reagent, calibrator, substrates and consumables expired, replace with new one and recalibrate. If not work or instrument error observed, contact our customer service department.
LVC indicates when substitute the current calibrator RLU into previous valid calibration curve done by the same lot reagent to calculate the concentration, the calculated concentration is out of range defined in the calibrator barcode. In this scenario, judge which of the current failed calibration curve and previous valid calibration curves is correct based on check the reagent, calibrator, QC, consumables, instrument and other factors. If previous calibration curve is correct, recalibrate after exclusion of risks. If current failed calibration curve is correct, extend the previous valid calibration curve and recalibrate, the instrument will not compare the new calibration curve with the previous calibration result after the extension.
CSDB indicates air bubbles are detected during substrate dispensing process. After the substrate is primed, recalibrate.
RGTL indicates the calibration result is based on insufficient reagent. Replace the reagent.
SMPL indicates the sample is insufficient during analysis. Refill the sample and recalibrate.
Bottle calibration: The reagent bottle can be calibrated individually. After calibration, its calibration parameters cannot be applicable to other reagent bottles and it also cannot acquire the calibration parameters from others.
Lot calibration: The reagent bottle can be calibrated by lot. After calibration, its calibration parameters can be applicable to other reagent bottles of the same lot.
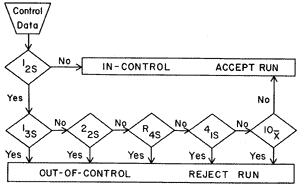
The well-known Westgard multirule QC procedure uses 5 different control rules to judge the acceptability of an analytical run is shown in below picture. The 12s rule is used as a warning rule and prompts a more detailed inspection of the data using the other control rules. If neither control observation exceeds a 2s limit, the analytical run is in-control and patients’ data may be reported. If either observation exceeds a 2s limit, the control data are tested by applying the 13s, 22s, R4s, 41s and 10x rules. If none of these rules is violated, the run is in-control. If any one of them is violated, the run is out-of-control.
The details of Westgard rules can be checked on official website: https://westgard.com/westgard-rules.html
Matrix effects can be thought of as the sum of all influences from the sample components except for the target measurand. The matrix components disturb detection process of the target measurand through physical or chemical actions, causing the detection results to deviate from the true values.
For example, when discussing sample matrix effects on a measuring system, it is important to remember that all components of the sample may contribute. In the case of diluting a serum specimen with DI water, all the components in the sample (eg, electrolytes, antibodies, hormones, enzymes) are present at their highest concentration before dilution. As the sample is diluted, the concentrations of these components decrease. When a diluent other than water is used, such as human serum albumin, the effects are twofold: the concentration of the components from the specimen decreases, and the components of the diluent (albumin) increase in concentration as dilution ratio increases. The more a specimen is diluted, the more the sample matrix is changed from pure patient specimen to mostly diluent.
The high-dose hook effect (pro-zone) describes a low measurement of analytes, which are otherwise present in very high concentration in the specimen. The hook effect is common phenomenon in day-to-day work of a clinical laboratory and should not be neglected.
Ideally, as concentrations of analyte in plasma or serum increase, the response from sandwich immunoassays increases as well. The increase in signal should be linear with concentration of the analyte. However, as the concentration of analyte increases above a certain point, the system gets saturated and the signal begins to decline, the plot of which resembles a ‘fish-hook’ [Figure 1]. As a result, this phenomenon earned the name “high- dose hook effect.” Theoretically, this issue is only applicable to sandwich immunometric assays without a wash step between reagent additions. But, in all sandwich assays, the signal begins to plateau with high concentrations of analyte due to limiting amounts of reagent antibodies and rare samples with extremely high concentrations of analyte can even lead to the hook effect in assays with a wash step. High-dose hook effect still remains a problem in many assay techniques like one-step immunometric assays, immunoturbidimetric assays, and immunonephelometric assays.

The protocol for solving the hook effect is doing dilution for sample. Samples are often tested undiluted and after dilution to detect the hook effect. If the result on dilution is higher than for the undiluted sample, then the undiluted sample most likely exhibited the hook effect.
Referrence: Ponnala A R .High-dose hook effect[J].Journal of Dr. NTR University of Health Sciences, 2014, 3(1):5-.DOI:10.4103/2277-8632.128412.
- Take the reagent out from the box and check: a. Whether the buckle is breaking; b. Whether the bar code is damaged; c. Whether the reagent panel is damaged; d. Whether the magnetic bead cavity can rotate flexibly.
- Place the reagent on the reagent mixer for about 10 seconds to suspend the sedimented magnetic beads, then invert and mix the micro particles until you can not see any sediment on the bottom
- Open the reagent compartment cover, tear off the aluminum foil, and check whether the silicon inlet is adhered;
- When the reagent bottle is loaded, one side of the magnetic bead cavity is provided with a limit buckle, and the other side of the enzyme-labeled reagent cavity is provided with an elastic buckle. Lift the grabbing part a little, clamp the limit buckle into the gear, and then hold the grabbing part and press it down. Hearing the "click" sound means successful installation. Press the control button of the reagent tray, when the reagent tray rotates, it drives the magnetic particle reagent bottle to rotate, indicating that the installation is normal.
- Unload the reagent bottles, hold the gripper and press the elastic buckle backwards until the limit buckle exits the gear, then the reagent bottles can be taken out.
Tips:
- Generally, reagents are stored in refrigerators at 2-8°C, in order to avoid reagents sticking to the refrigerator
wall and causing reagents to freeze and invalidate reagents; - The silicone membrane mouth of the reagent bottle is easy to stick. Please use a clean TIP to open it, and the
fact that the TIP cannot be reused in each cavity should be noted; - Make sure that the reagent bottle is completely stuck in the reagent tray, otherwise it will affect the accuracy of the results;
- When the system status is Standby, you are allowed to open the reagent compartment cover.
- Prepare substrate: Take out the substrate from the refrigerator and keep it at room temperature for above 6 hours. You are recommended to place the substrate in the balance position in advance. After balance, check whether the substrate bottle is intact, the bottom aluminum film is leaking, and the barcode is damaged.
- Load substrate: Tighten the substrate cap and pull out the used-up substrate container quickly. If there is substrate leakage, please use gauze to clean the substrate slot.
Quick Substrate Loading: Prepare new bottle of equilibrated substrate, scan bar code with hand-held bar code reader, remove the protective aluminum film from the bottom of the substrate bottle, loosen the substrate bottle cap about half circle, load substrate to current available position, press the indication light corresponding to the loading position to confirm that loading is complete.
Load Substrate via Consumable Management Screen: Select Reagent - Consumable Management- Substrate L or Substrate R-Load, the load Reagent window is displayed. Prepare new bottle of equilibrated substrate, scan bar code with hand-held bar code reader, Select Load to save the information, Select Exit to close the window. Remove the protective aluminum film from the bottom of the substrate bottle, loosen the substrate bottle cap about half circle, then load substrate to current available position.
Tips:
- Do not remove or insert the substrate bottles repeatedly.
- Keep the substrate bottles on the two substrate spikes (even if they are empty, do not remove them until loading the substrate in the lower bottle). Avoid the spikes being exposed to the air for a long time. If the substrate spikes are not used in the exposed air for a long time, clean the substrate tubes before use.
- Keep the substrate at room temperature for more than 6 hours.
- When loading substrate, be sure to loosen the substrate cap but do not discard the cap.
- When loading substrate bottle, gently press down till the substrate spike in loading position has punctured through the membrane at the bottom of substrate bottle.
- When wiping the substrate spikes with gauze, exercise caution to avoid touching them.
The analyzer will test HCG without dilution when you request the T β-HCG, while test HCG with 80-fold dilution for D T β-HCG. No matter for manual dilution or automatic dilution, the precondition is the concentration of diluted sample must be >30 mIU/mL, so the final HCG result should >2400 mIU/mL if select the D T β-HCG, otherwise run the sample again without dilution.